Setup & Usage Guide
Everything you need to install DECT, connect to your Bolero system, and access it from any device on your network — or remotely.
Last updated: April 13, 2026
Beta testers: Your beta license is valid for 30 days from approval. After that, you'll need to purchase a full license or request an extension.
1. How DECT Works
DECT is a modern replacement for the built-in Bolero web UI. It consists of two parts: a lightweight launcher (the desktop app) and a web-based interface that opens in your browser.
Here's how it works: the DECT launcher runs a small local server on your computer that talks to your Bolero antenna. When you click "Open in Browser", the full interface opens in your default web browser. This means once DECT is running on one computer, any device on the same network can also open a browser and access the same interface.
    ┌──────────────────────────────────────────────────────────────┐
    │                     YOUR LOCAL NETWORK                       │
    │                                                              │
    │   ┌─────────────┐         ┌───────────────────────────┐      │
    │   │   Bolero     │◄───────►│  Host Computer             │      │
    │   │   Antenna    │  REST   │                             │      │
    │   │  10.0.42.11  │  + WS   │  ┌───────────────────────┐ │      │
    │   └─────────────┘         │  │  DECT Launcher (app)   │ │      │
    │                            │  │  Starts local server   │ │      │
    │                            │  └───────────┬───────────┘ │      │
    │                            │              │              │      │
    │                            │  ┌───────────▼───────────┐ │      │
    │                            │  │  Local Server          │ │      │
    │                            │  │  (port 3001)           │ │      │
    │                            │  └───────────┬───────────┘ │      │
    │                            └──────────────┼──────────────┘      │
    │                                           │                     │
    │                            ┌──────────────┴──────────────┐      │
    │                            │  Web UI available at          │      │
    │                            │  http://<host-ip>:3001       │      │
    │                            └──────────────┬──────────────┘      │
    │                    ┌──────────────────────┼──────────┐          │
    │                    │                      │          │          │
    │               ┌────┴────┐          ┌──────┴──┐ ┌────┴────┐     │
    │               │ Browser │          │  iPad   │ │ iPhone  │     │
    │               │ (host)  │          │(Safari) │ │(Safari) │     │
    │               └─────────┘          └─────────┘ └─────────┘     │
    └──────────────────────────────────────────────────────────────┘
Think of it like this: The launcher is a small control panel that starts and manages the DECT server. Your browser is where you actually use the interface. The launcher must stay running (it lives in your system tray) for the browser interface to work.
2. Requirements
3. Installation
macOS
Log in to your account at dect.app/account and click Download for macOS.
Open the .dmg and drag DECT into your Applications folder.
Launch DECT. The app is signed and notarized by Apple, so it will open without any security warnings.
Windows
Log in to your account at dect.app/account and click Download for Windows.
Run the installer. If Windows SmartScreen shows a warning, click "More info" → "Run anyway".
Launch DECT from your Start menu or desktop shortcut.
4. First Launch
When you open DECT, you'll see the launcher window — a compact control panel that manages the DECT server running on your computer.
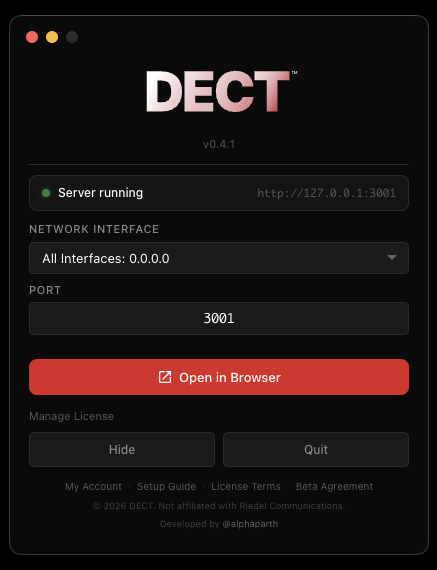
Wait for the server to start. The status indicator will change from yellow ("Starting...") to green ("Server running"). This takes a few seconds.
Choose a network interface (optional). The dropdown lets you select which network interface the server listens on. The default (All Interfaces) works for most setups. If you only want the server accessible from this computer, choose Localhost. If your computer has multiple network connections, you can pick a specific one.
Set the port (optional). The default port is 3001. You only need to change this if something else on your computer is already using that port.
Click "Open in Browser". Your default web browser will open with the DECT interface. This is where you'll activate your license, connect to your antenna, and use the full dashboard.
Changing interface or port? If you update the network interface or port, a banner will appear asking you to restart the server. Click "Restart Server" to apply the changes, then click "Open in Browser" again.
System tray
DECT lives in your system tray (menu bar on macOS, taskbar on Windows). You can close the launcher window and DECT will keep running in the background. Right-click the tray icon to:
- Show Launcher — reopen the launcher window
- Open in Browser — open the DECT interface
- Quit — fully stop DECT and the server
Don't quit the app. Closing the launcher window doesn't stop the server — it just hides the window. But clicking Quit (from the tray icon or the launcher) will shut down the server and disconnect all browsers.
5. License Activation
The first time you open DECT in your browser, you'll see the license activation screen. You need to activate before you can use the interface.
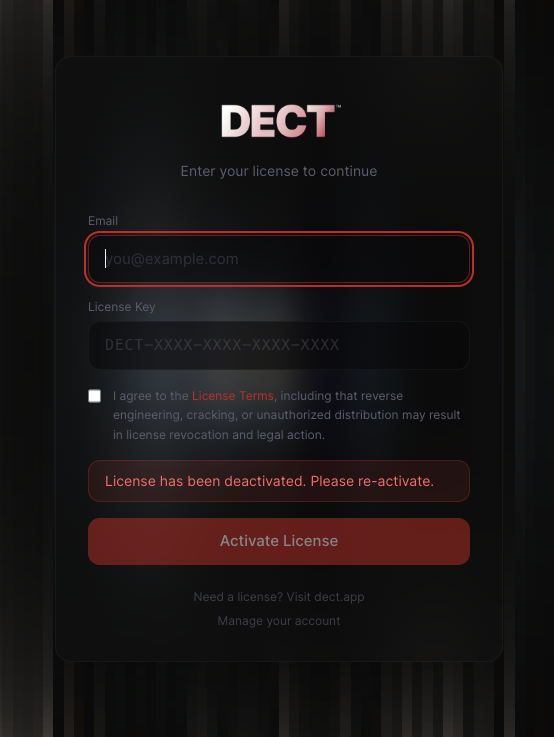
Enter the email address associated with your license (the one you used to sign up or purchase).
Enter your license key (format: DECT-XXXX-XXXX-XXXX-XXXX). You received this in your approval or purchase confirmation email. You can also find it in your account dashboard.
Check the box to agree to the License Terms, then click Activate License.
One device at a time. Your license activates on the machine you're using. If you want to move it to a different computer, just activate on the new machine — the old one will be deactivated automatically. No need to contact support.
Offline use. After activation, DECT works offline for up to 7 days. After that, it needs a brief internet connection to re-validate your license. This happens automatically in the background.
License persists. Your license is saved locally on the host computer. You can close the browser, restart the app, or reboot your machine — you won't need to re-enter your license key.
6. Connecting to Your Bolero System
After activation, you'll see the connection screen in your browser with a Bolero antenna IP field and a PIN pad.
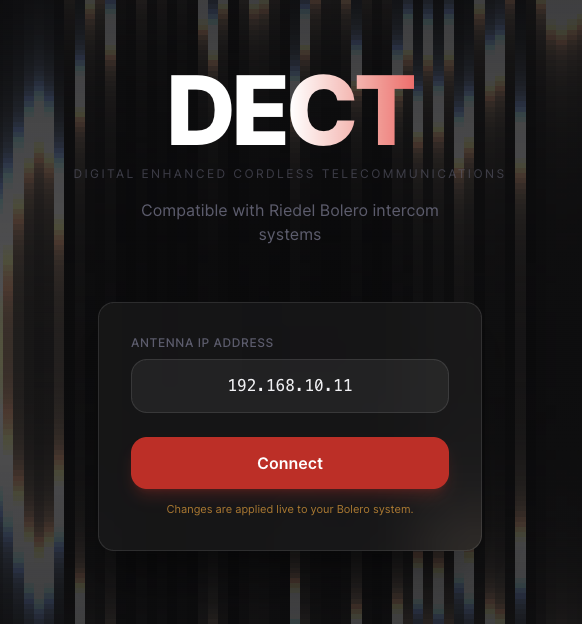
Enter your Bolero antenna's IP address (e.g., 10.0.42.11). This is the IP address of the antenna on your local network. If you don't know it, check your antenna's front panel display or your router's DHCP client list.
Enter the admin PIN (4-digit code). This is the same PIN you use to log into the original Bolero web UI. The default is 1234 unless your team has changed it.
Click Connect. DECT will verify the antenna is reachable, authenticate with your PIN, and load the full dashboard with all your beltpacks, profiles, partylines, and audio settings.
Remembered connection. DECT saves your antenna IP and PIN locally. Next time you open the browser, it will automatically reconnect to the same antenna.
Can't connect? Make sure your computer is on the same network as the Bolero antenna. Try pinging the antenna's IP address from your terminal: ping 10.0.42.11. If it doesn't respond, there's a network issue between your computer and the antenna.
7. Network Setup for Multi-Device Access
This is the most important section if you want to use DECT from your phone, tablet, or other computers. Read carefully.
Understanding the Bolero network
A Riedel Bolero system typically lives on its own isolated network. The antenna has an Ethernet port that connects to a switch or router. By default, this network might only have the antenna and maybe one computer on it.
To use DECT from multiple devices, you need those devices to be able to reach the host computer running DECT. There are two common scenarios:
Scenario A: Bolero is on your existing production network
If your Bolero antenna is already connected to the same network as your other devices (your Wi-Fi network, production LAN, etc.), then you're already set. Any device on that network can reach the DECT host.
Find the host computer's IP address. On macOS: System Settings → Wi-Fi → Details → IP Address. On Windows: open Command Prompt and type ipconfig. You can also see it in the DECT launcher's network interface dropdown.
On your phone/tablet/other device, open a web browser (Safari, Chrome, etc.) and go to:
http://<host-computer-ip>:3001For example: http://192.168.1.50:3001
You'll see the full DECT interface in your browser. You can configure beltpacks, monitor audio, manage profiles — everything the host browser can do.
Network interface matters. If you set the launcher to Localhost, only the host computer can access the interface. To allow other devices, use All Interfaces or select the specific network interface connected to the Bolero network.
Scenario B: Bolero is on its own isolated network
Many productions run the Bolero system on a dedicated network that's separate from the venue's main Wi-Fi. In this case, your phones and tablets can't reach the DECT host because they're on a different network.
The solution: Add a Wi-Fi access point (router) to the Bolero network so wireless devices can join it.
    ┌────────────────────────────────────────────────────────────┐
    │                  BOLERO NETWORK (e.g., 10.0.42.x)         │
    │                                                            │
    │  ┌──────────┐    ┌──────────┐    ┌───────────────────┐     │
    │  │  Bolero   │    │  Host    │    │  Wi-Fi Access     │     │
    │  │  Antenna  │    │  PC      │    │  Point / Router   │     │
    │  │ 10.0.42.11│    │10.0.42.50│    │  10.0.42.1        │     │
    │  └──────────┘    └──────────┘    └────────┬──────────┘     │
    │                                           │  Wi-Fi         │
    │                               ┌───────────┼───────────┐    │
    │                               │           │           │    │
    │                          ┌────┴───┐  ┌────┴───┐  ┌────┴─┐  │
    │                          │ iPhone │  │  iPad  │  │ Any  │  │
    │                          │        │  │        │  │Device│  │
    │                          └────────┘  └────────┘  └──────┘  │
    └────────────────────────────────────────────────────────────┘
How to set up the Wi-Fi access point
Get a small Wi-Fi router or access point. Any consumer router will work (TP-Link, Netgear, etc.). You can often find these for under $30.
Connect the router's WAN or LAN port to the same network switch your Bolero antenna is on.
Configure the router to be on the same subnet as your Bolero network. If your antenna is at 10.0.42.11, configure the router's IP to something like 10.0.42.1 with a subnet mask of 255.255.255.0.
Enable DHCP on the router so that phones and tablets automatically get an IP address on the Bolero network when they connect to the Wi-Fi. Set the DHCP range to something like 10.0.42.100 – 10.0.42.200 to avoid conflicts with your existing devices.
Set a Wi-Fi name (SSID) and password. Use something like BOLERO-CTRL so your crew knows which network to join. Always set a password — you don't want random people on your intercom network.
Connect your phone/tablet to this Wi-Fi, then open a browser and go to http://<host-computer-ip>:3001.
Pro tip: If you're using the router in "access point" mode (sometimes called "bridge" mode), it won't create a separate subnet. Devices connecting to its Wi-Fi will be directly on the Bolero network. This is usually the simplest setup.
Important: If your Bolero network already has a DHCP server (many production networks do), set the new router to access point / bridge mode instead of router mode. Running two DHCP servers on the same network will cause IP conflicts and connectivity issues.
8. Accessing DECT from Mobile Devices
Once you have network connectivity (either Scenario A or B above), accessing DECT from any device is simple:
Make sure the DECT launcher is running on the host computer (check for the DECT icon in your system tray). The launcher must stay running — it's the server that all devices connect through.
On your mobile device, open any web browser (Safari, Chrome, Firefox).
Type in the host computer's IP address and port:
http://<host-ip>:3001Bookmark it or add it to your home screen for quick access. On iOS Safari, tap the share button → "Add to Home Screen". It will look and feel like a native app.
How do I find the host's IP? Open the DECT launcher — the network interface dropdown shows your available IP addresses. You can also check the header bar in the browser interface.
Multiple users at once: Yes, multiple people can access the DECT interface simultaneously from different devices. All changes are reflected in real-time across all connected browsers thanks to WebSocket live updates.
9. Remote Access (Over the Internet)
In some cases, you may want to access your Bolero system remotely — from a different location, over the internet. This is possible, but requires careful consideration of security.
Security warning: Exposing any service to the internet carries inherent risk. Your Bolero intercom system controls live production communications. Unauthorized access could disrupt your production. Any remote access setup is entirely at your own risk. We strongly recommend using a VPN or zero-trust solution instead of direct port forwarding.
Option 1: VPN (Recommended)
A VPN creates an encrypted tunnel between your remote device and your production network. It's as if your phone is plugged directly into the Bolero network, but over the internet. This is the safest option.
Popular VPN solutions:
- Tailscale — The easiest option. Install it on the host computer and your remote device. They'll be on the same virtual network instantly. Free for personal use (up to 3 users). No port forwarding, no firewall changes, no configuration needed.
- ZeroTier — Similar to Tailscale. Peer-to-peer mesh VPN. Free for up to 25 devices.
- WireGuard — Fast, modern VPN protocol. Requires more setup (you need to configure a WireGuard server on your network), but very lightweight and performant.
Using Tailscale (step-by-step)
Install Tailscale on the host computer running DECT. Sign up at tailscale.com and follow their install guide.
Install Tailscale on your remote device (phone, tablet, laptop). Log in with the same account.
Find the Tailscale IP of your host computer. It will be something like 100.x.y.z. You can find it in the Tailscale app.
On your remote device, open a browser and go to:
http://<tailscale-ip>:3001For example: http://100.64.0.5:3001
Why Tailscale is ideal: No ports to open, no firewall rules to change, traffic is encrypted end-to-end, and it works through NATs and firewalls automatically. It takes about 5 minutes to set up.
Option 2: Port Forwarding (Not Recommended)
If your network has a public IP address, you can configure your router to forward an external port to the DECT host. This makes DECT accessible from anywhere on the internet.
We strongly advise against port forwarding. Opening a port on your network exposes your Bolero system to the entire internet. Bots constantly scan for open ports. If someone finds yours, they could potentially access and disrupt your intercom system. If you must use port forwarding, understand that you do so entirely at your own risk.
If you still want to proceed with port forwarding (we really don't recommend it):
- Log into your network router's admin panel.
- Find the Port Forwarding section (sometimes called "Virtual Servers" or "NAT").
- Create a rule: forward an external port (e.g.,
43001) to the DECT host's internal IP on port3001. - Find your public IP address (Google "what is my IP").
- Access DECT remotely at
http://<your-public-ip>:43001.
If you must port-forward, at minimum:
- Use a non-standard port number (not 80, 443, or 3001).
- Restrict access by source IP if your router supports it.
- Consider putting a reverse proxy with HTTPS and authentication (like Cloudflare Tunnel or Nginx + Let's Encrypt) in front of it.
- Monitor your router logs for unauthorized access attempts.
- Change the Bolero admin PIN from the default
1234to something strong.
Option 3: Cloudflare Tunnel
A middle ground between VPN and port forwarding. Cloudflare Tunnel creates an outbound-only encrypted connection from your host to Cloudflare's network. No ports need to be opened. You can add Cloudflare Access policies to restrict who can connect (e.g., only specific email addresses). Free tier available.
10. Account Management
Manage your license and downloads at dect.app/account.
What you can do
- View your licenses — see all your license keys, activation status, and which device they're on
- Download the app — get the latest version for macOS or Windows
- Transfer your license — deactivate from one device so you can activate on another
- Resend your license key — get your key emailed to you again
How to log in
Go to dect.app/account and enter your email.
Check your inbox for a 6-digit verification code.
Enter the code — you're in.
Quick access from the launcher. You can also reach your account page by clicking "Manage License" in the DECT launcher window, or from the links in the launcher footer.
11. Troubleshooting
"Server won't start" / launcher stays on "Starting..."
- Check if another application is using port
3001. Try changing the port in the launcher to something else (e.g.,3848). - On macOS, check System Settings → Privacy & Security → App Management to ensure DECT has permission to run.
- Try quitting DECT completely (from the tray icon) and relaunching.
"Can't connect to antenna"
- Verify the antenna IP is correct. Check the antenna's display or your router's DHCP leases.
- Make sure the host computer is on the same network/subnet as the antenna.
- Try pinging the antenna: open Terminal (macOS) or Command Prompt (Windows) and run
ping <antenna-ip>. - Check if a firewall on the host computer is blocking outbound connections.
- Try accessing the original Bolero UI at
http://<antenna-ip>in a browser to confirm the antenna is reachable.
"Can't access DECT from my phone"
- Make sure the DECT launcher is running on the host computer (check the system tray). If you quit the app, the server stops.
- Confirm your phone is on the same network as the host computer.
- Check that the launcher's network interface is set to All Interfaces (not Localhost). If set to Localhost, only the host computer can access the interface.
- Double-check the host IP and port (
:3001). - Try typing the full URL including
http://— some browsers default to HTTPS which won't work. - Check if the host computer's firewall is blocking incoming connections on port
3001. On macOS, go to System Settings → Network → Firewall and ensure DECT is allowed. On Windows, check Windows Defender Firewall → Allow an app.
"License activation failed"
- Make sure you're connected to the internet (license validation requires a one-time online check).
- Verify you're using the exact email address from your purchase.
- Copy-paste the license key to avoid typos. It should be in the format
DECT-XXXX-XXXX-XXXX-XXXX. - If you recently transferred your license to this device, wait a few seconds and try again.
- Contact support@silo.center if the issue persists.
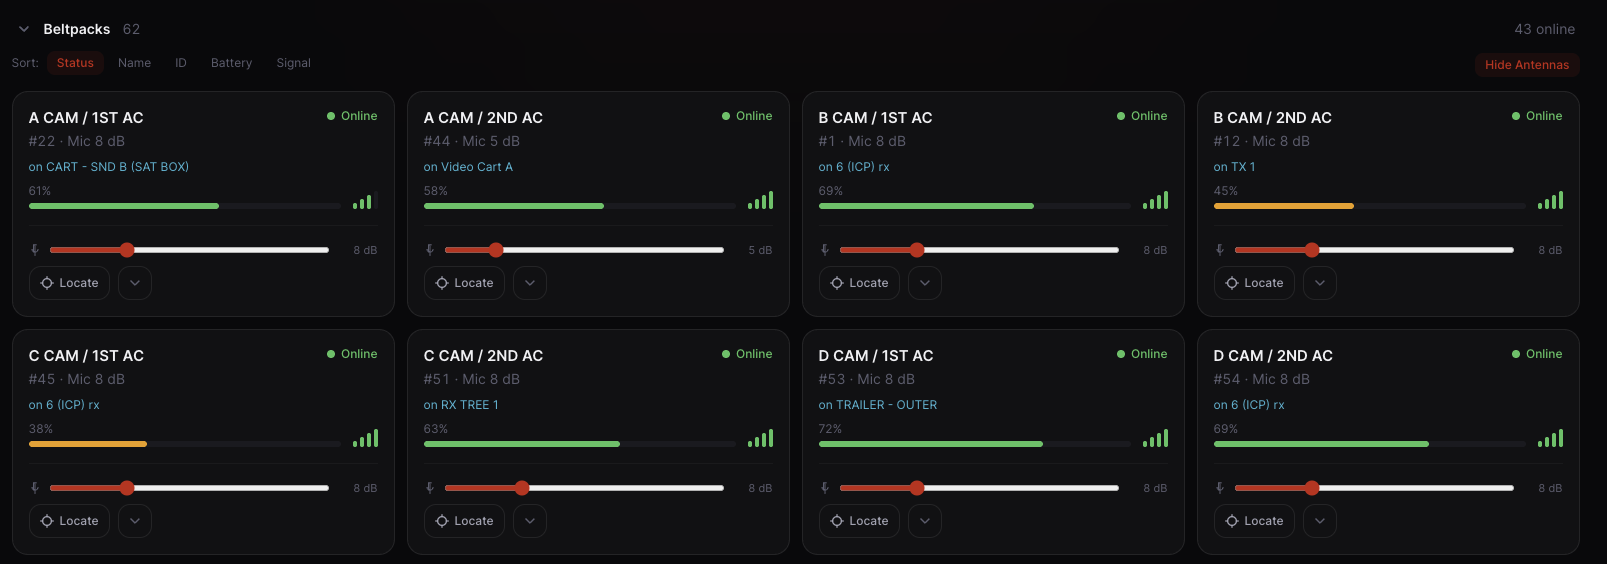
"Dashboard loads but shows no beltpacks"
- Make sure your Bolero beltpacks are powered on and registered to the antenna.
- Check the Beltpacks section — it may be collapsed. Click the section header to expand it.
- Verify the antenna has beltpacks registered by accessing the original Bolero UI at
http://<antenna-ip>.
"Changes aren't saving"
- After editing a beltpack or profile, make sure to click the Apply button. Changes aren't sent to the antenna until you apply them.
- Check for any error banners at the bottom of the screen — they'll tell you if the antenna rejected the change.
- Verify you're logged in with admin privileges (4-digit PIN), not service mode.
"Browser shows 'connection refused' after reboot"
- The DECT launcher needs to be running for the browser interface to work. Launch the DECT app and wait for the server status to turn green.
- If you bookmarked the URL, make sure the port hasn't changed.
Still stuck? Send us a message at support@silo.center or use the Feedback form on our website. Include your operating system, what you were trying to do, and any error messages you see.